Recently I had the opportunity to setup a clients Umbraco site with Azure Front Door and thought it would be a great topic to blog about. Their site runs Umbraco 7 with Ucommerce, which contains three different sites within and all use different domains to access.
I only found one post on skrift.io about it but it wasn’t 100% useful for our scenario. In their post they separate the different sites by path rather than domain. Additionally, I wanted to pass on the production domains to the backend. We don’t use a custom ‘helper’ domain for our scenario.
Before reading on
Before you start reading this, I thought I would include the deal breakers first, so I don’t waste your time. My case may not be suitable and may require a different approach or more reading elsewhere. However every section has a title so feel free to skim through.
CNAME flattening / DNS Chasing
Before you start you should check if its possible to configure a CNAME for your naked domain. If you use Azure DNS then you have nothing to worry about. I believe you can also set this up with Cloudflare DNS as well. Additionally, if the Umbraco site is already using a subdomain for production such as www. then you have nothing to worry about either.
A quick and dirty solution is to move your site to using www. You can then easily map a CNAME and setup a redirect from the naked domain to www.
The problem is Azure Front Door is a global service and so its not tied to a single IP address so an A Record is not ideal. Adding a CNAME will allow different regions of the world to connect to the closest Front Door for them. You can read more about it here in the Microsoft Docs.
Using a single Web App in the pool
We are not using multiple backend pools for our case. We have a single web app which takes 100% of the weight. Our main use for Front Door is to setup a WAF (Web Application Firewall) and later down the line potentially configure another web app in another region to provide lower latency to visitors on the other side of the globe. If we decide to go down that path I will write another blog post.
You need to configure output caching
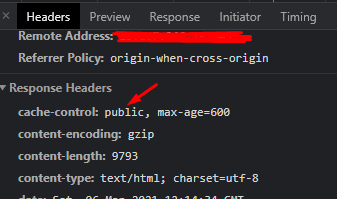
We have implemented caching as a plaster for a few slow performing Ucommerce pages. To do this your cache-control header for the page must be set to public otherwise Front Door won’t cache it.
We do this by enabling Output Caching on the method in the controller that handles the request. Here the duration is set to 10 minutes so Front Door will only cache the request for 10 minutes and then automatically fetch a newer version on the next request.
[OutputCache(Duration = 600, VaryByParam = "param1;param2;queryParam", VaryByHeader = "host")]This was done on Umbraco 7
I have not tested this with Umbraco 8 however I don’t imagine there being any issues. As long as you have configured Umbraco 8 for Azure Web Apps it should be fine.
Let’s jump in
Configure Web App Custom Domains
I will presume you have configured Umbraco for Azure Web Apps. You can learn more about it here on Our Umbraco.
First lets setup the host headers for our Web App, we will do this pre-emptively by using TXT DNS records. This ensures we do not affect any live traffic if this is an active production domain.
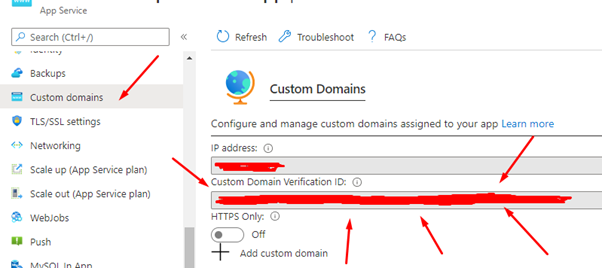
You will need to find your Custom Domain Verification ID. You can find this by visiting the Web App and going to Custom domains in the Azure portal.
With your ID in hand add TXT records for your naked domain and/or subdomains. For a Naked domain make sure the host is asuid and the value is the ID. For each subdomain you simply need to add it to the end of asuid. Like so:
asuid	        TXT	   The ID
asuid.www	    TXT	   The ID
You can read more about it here: Microsoft Docs.
Once those TXT records are added you can add the domain to the web app without having to set an A Record or CNAME as the TXT record verifies ownership. I will presume you know how to add a domain to a web app.
Once the domain is set, you should be able to add your certificates.
Deploy your Umbraco release
Next deploy your Umbraco site to the Web App and make sure its working properly. In Windows you can update your HOSTS file to point your production domains at the Web App. In the Azure Portal on the custom domains section, you can obtain the IP address of the web app to point the production domain. This will allow you to test your Umbraco site under your Azure Web App with production domains.
Configuring Azure Front Door
Frontend/domains
Now we get to the main part of this post, configuring Azure Front Door. I will presume you have completed the Create a Front Door wizard and given your Front Door a name. (The name set here will determine what our CNAME records will be when moving Azure Front Door to production)
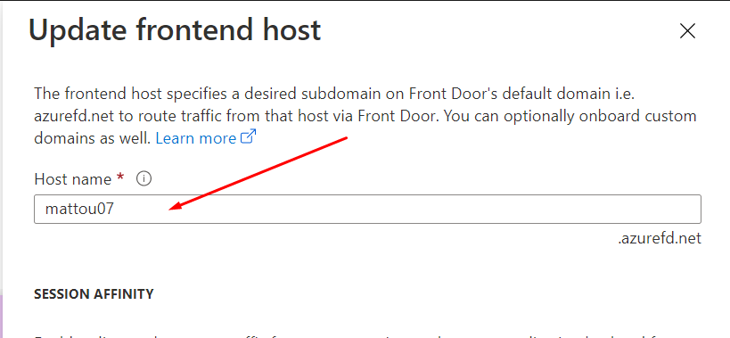
Regardless, you can still follow along below as I will be going through the three stages anyway. However its recommended you complete the Wizard fully so the Front Door is created. In the below image my Front Door has the name of mattou07.
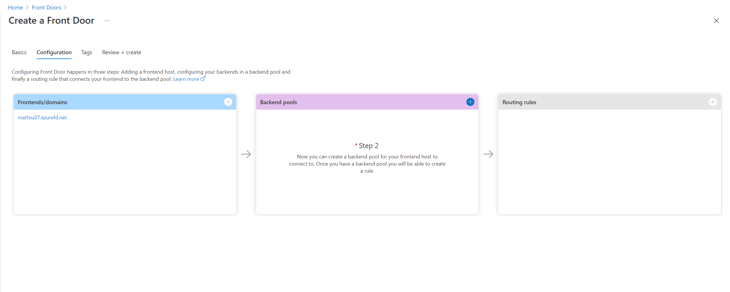
First, we need to setup our point of entry, our custom domains! (You cannot do this in the Create a Front Door wizard, the Front Door needs to be created first. Skip to the backend pools step and then come back to add more domains).
Similar to setting up our domains on a web app, we can pre-emptively configure our domains for Front Door without affecting live traffic as well. However, we are using CNAME records for this. You can find more about this here in the Microsoft Docs. We essentially add afdverify in front of our domain names. We will need the following CNAME records:
For a naked domain
    afdverify.mattou07.net	CNAME	   afdverify.mattou07.azurefd.net
For a www subdomain
    afdverify.www.mattou07.net	CNAME	   afdverify.mattou07.azurefd.net
These CNAMEs prove ownership and we can now add our domains to to front door without affecting production traffic.
Certificates
You have two choices have Front Door provision a certificate for you or add your own certificate. If you decide to add your own certificate, there’s one quirk I will note about that could save you some head scratching later.
If you directly use a certificate that you exported from Microsoft Management Console (MMC) you will run into this error (The private key is not RSA or it is unreadable): https://github.com/MicrosoftDocs/azure-docs/issues/50164
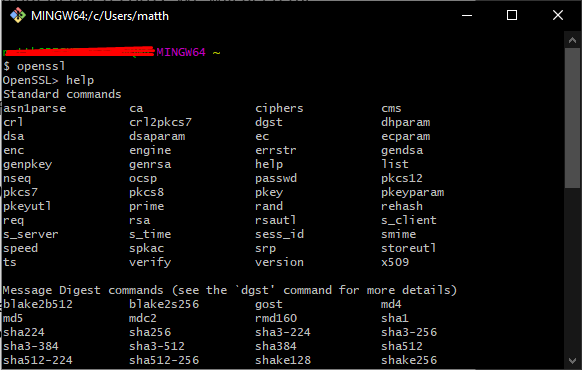
You will need to use OpenSSL to generate your certificate. First you export the PFX from MMC as normal and with this PFX you recreate it with Open SSL using the following commands. Thanks @sgissinger
# Use OpenSSL to export private key and certificate from your certificate exported from MMC to PEM format
openssl pkcs12 -in myMMC.pfx -out openSsl.crt -clcerts -nokeys -passin "pass:P@sw0rd1" -passout "pass:P@sw0rd1"
openssl pkcs12 -in myMMC.pfx -out openSsl.key -nocerts -passin "pass:P@sw0rd1" -passout "pass:P@sw0rd1"

# Use OpenSSL to create a new PFX certificate using files created by previous commands
openssl pkcs12 -export -inkey openSsl.key -in openSsl.crt -out azure-fd.pfx -passin "pass:P@sw0rd1" -passout "pass:P@sw0rd1"
If you have installed Git For Windows you can use the Git Bash console to use openssl. Below I started openssl and used the help command:
I may discuss this further in a separate blog post. Where I completely run through how to create the PFX, import it into Azure KeyVault and then into Azure Front Door. Let me know if that would interest you!
Backend pools
Now we need to setup a backend pool although only one app is in this pool. Give the pool a name and then let’s add a backend.
Pick App Service as our host type and then pick the Web App your Umbraco site is running on. Now here is the trick set the Backend host header to empty.
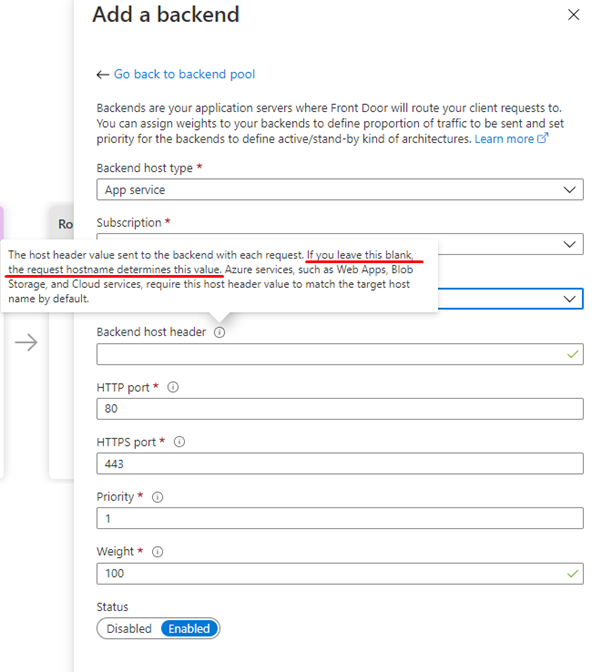
By keeping the host header unspecified, we are telling Front Door to not rewrite the hostname as it passes through Front Door. So, when a visitor visits a production domain. Front Door will pass on the same production domain to the backend. Umbraco can then work with production domains in its Culture and hostnames rather than helper domains. This provides a familiar editing experience for our clients Umbraco editors as they don't see unfamiliar domains when previewing pages.
We set the weight to 100% as we only plan to have one app in the pool for now.
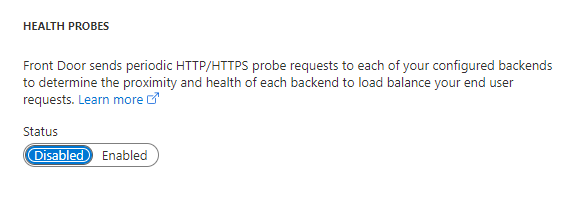
Another quirk we ran into is health probes however this is dependent on your situation. If for whatever reason your app has issues running on other domains such as giving a 500 error if you visit it on a domain Umbraco is not configured for. The health probe will constantly ping the web app until it gets a healthy response. Which can degrade performance and generate unnecessary traffic.
Since I have one app in the pool we don’t need a health probe. Health probes are mainly used to determine which backend is the best one to use for a visitor. If one is unhealthy the traffic will be sent to a healthier app. In my case I set it to disabled:
Since I am only using one web app we don’t really need to focus on load balancing, I set my sample size to 1, successful samples to 1 and latency to 0.

Routing rules
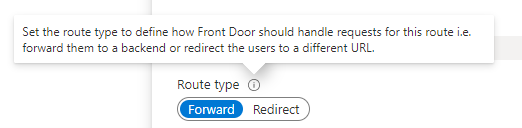
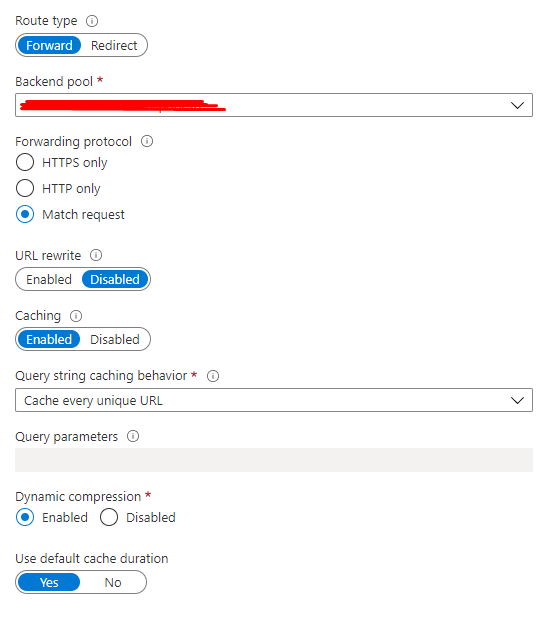
Last step is setting up the routing rules. You can setup multiple rules to apply different rules to different domains. I won’t go into too much detail here as you may have your own requirements for routing. Only thing that is important is to set the Route type to Forward. This will forward our production domain to the backend pool.
However, I will go over caching. I presume you have enabled Output Caching on your controller and the paths you want to cache all return a public cache-control header when requested.
First step is to pick the Frontend/domains you want the caching to act on. Then we need to set the patterns to match. Yes, caching can be domain specific if desired.
For example, you may want to cache the product page of your site. So, you would put /en/products/* if that was your path to the products page and subpages. If these use an Umbraco surface controller you may want to add another path such as /umbraco/Surface/MyProductsSurface/GetProducts to cache this as well.
Forward the request to your backend pool like before and then enable caching, caching every unique url and enabling Dynamic compression:
The added benefit of Azure Front Door caching is globally your product pages will be fast around the globe without having to configure your Umbraco app for load balancing. As your html etc. is cached in Azure's Global CDN.
That should be it!
Testing
You should now be ready for Azure Front Door. To test I recommend updating your hosts file to point your production domains at Azure Front Door. To do this ping the Front Door domain (nameofFrontdoor.azurefd.net) in Command Prompt:
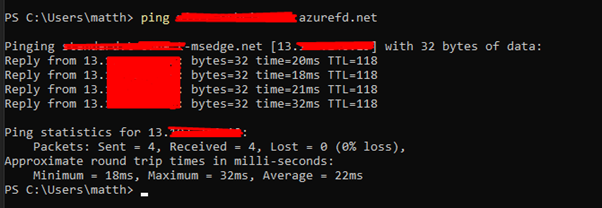
You will get an IP address that you can point your production domain to. Now when you visit the production domain you will be hitting your Front Door.
You can verify this is working if you installed a new certificate with a later expiry date than the current production site or by adding a random text file to the web root on the Azure Web app.
Thanks for reading, let me know if I have missed anything. My Twitter DMs are open.